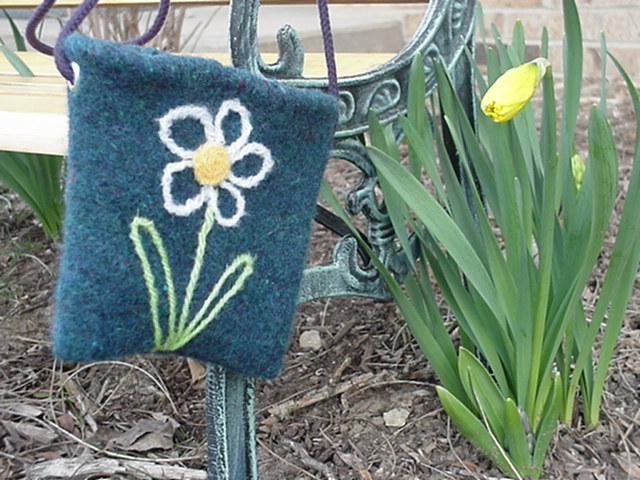
 Made from a felted sleeve (discarded while making the Oopsy Daisy Satchel Bag), the Envelope Bag has become my favorite summertime purse. With my cell ph
 one and a few other essentials tucked inside and hanging securely around my neck, I am ready to go to the park with both hands free for helping young athletes make their way across the "monkey bars". Cording is threaded through eyelets on the sides of the bag, and there is a sewn in snap closure at the top.
(This pattern is the property of YarnThrower and may not be reproduced except for one copy for individual use. If you otherwise print or distribute this pattern without YarnThrower's written permission, you are stealing.)
Finished Measurements:
Bags shown measure 6 x 5 inches and 7 x 7 inches
Materials:
- A felted sleeve from a sweater gone bad (see directions for Oopsy Daisy Satchel Bag)
- Sewing shears
- A few yards yarn for hemming edges, to match or contrast with sweater
- Sharp tapestry needle
- Felting needle
- Foam
- Assorted scrap bits of yarn of any material (novelty okay)
- Chalk pencil (optional)
- Serger or sewing machine (optional)
- Two 0.25 inch eyelets
- One 0.75 inch sew-on snap
- 2 yards of cording, either purchased OR made by felting knitted I-cord
Pattern:
- Use one of the sleeves from the sweater. The bag may be made from a part closer to the top of the sleeve (for the larger bag) or from a part closer to the cuff of the sleeve (for the smaller bag). Leaving a 0.5 inch hem allowance for the bag top, make a cut straight across the sleeve for the bag top. Leaving a 0.5 inch seam allowance for the bottom seam, make a cut straight across the sleeve for the bag bottom.
- Fold top edge of bag 0.5 inches to the inside, and overcast stitch it in place using a sharp tapestry needle and matching or contrasting yarn.
- Needle felt per directions included in Oopsy Daisy Satchel Bag pattern. If foam is too large to fit inside the bag, just place the whole bag on top of the foam, needle-felt the design onto the front of the bag, and then carefully open the bag to separate the bag front from the bag back (which may have gotten a little bit "caught" in the needle felting, but which should easily pull apart).
- Turn inside-out (so right sides are together). Stitch lower edges together using a serger, a sewing machine, or by hand. Turn right-side-out.

- Attach sew-on snap to top centers of bag on inside.

- Following package directions for eyelets, attach one to each side of bag, just below hemmed edge.
- Thread cording into eyelets, one end on each side of bag, going from outside toward inside of bag. Adjust length and tie each end into a knot to hold it securely just inside the eyelet. Trim off excess.
No comments:
Post a Comment